Thursday, May 28, 2015

A Simple Color Correction Photoshop Tutorial

Photoshop Tutorial - Often we made ​​the photos are dark and dull. This can happen for various reasons, such as you are photographed in bad cloudy weather, at night or in a dimly lit room. And of course, looking at pictures on a monitor or print them, you are simply frustrated and no matter how you tried to pick the aperture and shutter speed the result of your exposure is poor. But do not worry, because in this tutorial on Photoshop , you'll learn how to improve your photos in just a few steps!

A Simple Color Correction
The beauty of this lesson lies in the fact that all these steps are very simple to understand and almost universal for all the photos. In a simple example, we analyze with you such processing steps as framing and fix horizon, enhance the contrast and brightness using the curves, creating a bokeh effect using texture mapping, and improve clarity. What let's get started!

For example, I chose this photo cat Snowball:


Result:


Note : digress. For processing this picture, I used Photoshop CS2. Why is that? The first is now officially Adobe allows you to download and use Photoshop CS2 absolutely free! I wrote about it here . For beginners, it is just a fairy tale. Secondly all the tools are present all the necessary tools as permissible in the version CS6. So let's have at last begin to adjust the picture.


Step 1 - Fix the horizon and framing
Some pictures are littered with the horizon, and with the extra objects captured in the frame. To fix this you need to use two tools:

Transform Selection (transformation tool selection)
Crop (Crop Tool)
Of these two tools, I wrote a separate lesson: Cropping photos where everything is painted in detail and described. However, let us briefly review their principle of operation again.

To use the tool  Transform Selection , you must first make a selection of the canvas by pressing the keyboard shortcut CTRL + A.

Remember : without a selected object, you can not activate a transformation tool.

You will notice that appeared around the canvas dotted lines. This is our selection. Now you can activate the tool  Transform Selection  press the key combination CTRL + T : Pay attention to the selected point. With these points, you can stretch the image. But now we just need to rotate the image and align horizon. To do this, move the mouse pointer off the canvas. The cursor should take the form of two arrows. Now hold down the left mouse button and rotate the picture: Now we use the tool Crop to crop and trim all excess. This tool, you can activate both the palette and with the power of the hotkey C: Remove the selection by pressing CTRL + D and pulling point, crop area, as shown below: Then press  Enter :


Step 2 - Increase brightness using Levels

Now let's make our picture brighter and more contrast. To do this, we can use the adjustment layer Curves (Curves), or simply a tool Curves  (Curves).

For this image, we will use the tool  Curves  (Curves), but first make a duplicate of the base layer by pressing the keyboard shortcut CTRL + J:


Then press CTRL + M to activate the tool:


Experiment with the curve as long as the image is brighter and lighter. Raising a point of the curve up, you increase the brightness, dropping point down, you make darker tone. That's what I got:


In most cases you will need to create multiple points on the curve, as in this case. For more information about the curves you can know here .


Step 3 - Create the highlights and shadows in the eyes and remove defects

In this step, we give the cat eye expression. To do this it is best to use two tools:

Dodge Tool
Burn Tool

Select the  Dodge Tool  (Dodge) and its settings, set Highlights (Light). Thanks to this tool will only affect the highlights:


Now try to make a glare in his eyes brighter:


Then activate the tool  Burn  (Burn), and its settings, set the Shadow (Shadow) to the shading effect affects only the dark areas. Darken some areas in the eyes:


In addition to the eyes, I also darkened the cat's nostrils. Let's remove the defects in the eye. In this case, it is more convenient and the easiest way to remove defects from the conventional instrument Stamp (Stamp). But to do it as efficiently, you need to lower the opacity of the effect of the instrument in its settings.

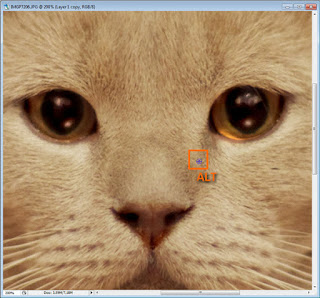
Select the tool  Stamp  (Stamp), and in its place the parameter setting Opacity (opacity) value of 25%


This tool allows you to use a texture from anywhere on the canvas. To select the texture, hold down the ALT key and click on the area next to the eye:


All textures selected now release the key and a few mouse clicks zaretushiruyte "dirty" area:


Do the same thing with the other eye:

Step 4 - Sharpening

Now the picture does not look as clear as would be desirable. But Photoshop allows you to correct this deficiency. The method that will be presented here in my opinion is one of the most successful and correct, because it is more flexible and moreover, does not "destroy" the image in contrast to the filters.

To get started, connect all layers by pressing the key combination CTRL + SHIFT + E. And then make a duplicate of this layer (CTRL + J)

The first layer and change the blending mode to Overlay (overlap)


Then apply the filter Hight Pass ... (color contrast)


In the setting of the filter follows the contour. Adjust it so that the contours have become a little noticeable, but be careful here not to be overzealous. You will immediately see the result of adjustment definition. When you are satisfied, click OK, and then connect all the layers into one by pressing CTRL + SHIFT + E.

Step 5 - Creating the effect of bokeh

The final step, we give a picture mood creating bokeh effect. You can use a variety of textures, such as this picture, I used a texture that's out of this set . All you need is to add a texture to the canvas:


Then, change its blending mode to Soft Light (Soft light) and slightly lower the opacity: You can use the eraser to erase the part of the texture on the body of the cat. Then you can slightly increase the brightness in the same tool Curves.


That's all. Remember that these steps are universal for almost all images. Now that you know the sequence of actions and the necessary tools. I hope you have found for themselves something useful. Ask questions, subscribe to site updates are added to the social network, and put Like all good to you.


Wednesday, May 27, 2015

How to make a realistic tears in Photoshop

How to make a realistic tears in Photoshop - In this short tutorial for beginners, you will learn how to make a realistic tears in Photoshop in just a few minutes.
realistic tears in Photoshop

Step 1
Open the desired image in Photoshop. Then select the tool Pen (Pen) and try to create a form of tears. The form should be filled in with black. By the way, you can simply search and download on the Internet brush tears. Make sure that the form has turned rough and looks like a real tear.


Step 2
Change the blending mode of the layer with a tear in the Screen (screen), go to Layer> Layer Style> Blending Options. (Layer - Layer Style - Blending Options) and set the layer styles as shown below:


Step 3
It looks quite good, but not as realistic as it would like. We need to add some white glare to tears. Select the tool Pencil (Pencil), set the size of about 1 pixel, and then on a new layer, make a few white dots, as shown in the image below.


Step 4
Select the tool Blur (Blur) and slightly blur the white point:


As a result, we were able to create a realistic and transparent beautiful tear. Do not be afraid to experiment, and you get your own interesting effects !


How to Make a Bruise in Photoshop

How to Make a Bruise in Photoshop - this tutorial I will share how to make a bruise on the face, sometimes you just need to add a few brown and purple spots to your face.

In this tutorial, Ill show you how to turn this:


Into this:


The idea here was to make her look like she got into a barfight and the police arrested her and photographed her at the station.

I used Photoshop to do this and have never used PSP or the GIMP, but the techniques I used are all really basic, so I assume it works more or less the same there.        


As with every chop, it starts with the source pictures. I chose this source picture because it has the technical quality of a professional studio photograph, but it is still fairly unprocessed, by which I mean that it is not completely retouched and still shows Madonnas wrinkles, the pores in her skin, slightly bloodshot eyes and even a few hairs on her upper lip.

OK, lets start chopping! Well start with the bloody nose. I found a source picture of some guy who used fake blood to create a bloody nose for a theme party. I roughly cut out the part that I needed, put it on a new layer above my Madonna layer and switched the blending mode to multiply.


I then masked away everything I didnt like with a soft brush and raised the brightness on the bloody nose layer to about +50 to make it blend in better. Voila, her nose is bleeding!

(Note: to make the Brightness adjustment layer only apply to the bloody nose layer, hold your mouse pointer in between the two, hold down your Alt key and click.)


Next step: the black eye (her right eye).

You could simply paint the skin around her eye with a low opacity soft brush on a separate multiply or colour layer, using yellow, blue and purple colours, but I already told you I am a lazy chopper, so I started by getting a source picture of an actual black eye and followed the same procedure as I did for the bloody nose. Again, I switched the blending mode to multiply, masked away what I did not need and tweaked it with brightness. I also desaturated the black eye layer a bit, because it was too colourful for my taste.


I did not think the result was strong enough, so I muttered some curses under my breath, took out a brush and painted some extra colour on. It was around that time that I realised the entire picture was much too colourful to be taken by a regular camera in a police station, so I simply took the saturation of the whole thing down to -50. This also helped making her face look paler and more worn-out. After all, they picked her up late at night in some shady bar!


I figured Madonna must have cried a little from all the commotion, so I asked my girlfriend if she could please put some extra make up on her left eye and pour some water over it. To stop my whining, she actually did and I made a photograph. Yay!

I also found source pictures of a nasty bruise and some even nastier pimples and I repeated the multiply trick for all three photographs. Really, the bottom line is you can blend almost everything into anything, because you can play around with Hue/Saturation, Brightness/Contrast, Levels and Curves until it looks good. Try to always apply these adjustment layers to the pictures that you want to add to your starting image. If you apply them to your starting image itself, you might be able to blend things in nicely as well, but you are basically downgrading your main source picture, which was already looking fine to begin with.


Were almost done. To finish it off, I added the measuring scale (again, find a source picture and blend it over the background). Since the background is white, this is a simple matter of using the multiply blending mode and youre done. I also darkened the skin around her left eye, painted a little more shadow on her cheeks, drew a few more tiny hairs on the sides of her upper lip and in her eyebrows and used Liquify to raise her right lower eyelid a bit to make it appear more swollen.

Finally, I sharpened the whole image with the Unsharp Mask filter (use a low Threshold value to make details like her pores more visible).

Were done!


You have probably noticed that I have consistently used the multiply blending mode throughout this tutorial. While this is definitely a blending mode that I use a lot, it is really just a coincidence that I have used the same blending mode the whole time.

Make sure to always flip through all the blending modes when youre blending something. Just select the one at the top and then go down the list by hitting the arrow down key on your keyboard. Youll be surprised to see all the cool results. Just pick the one that fits best for the image youre blending in.