Photoshop Tutorial: Make a Blue Star Effect - This photoshop tutorial is not so hard to achieve but rather long + or - 14 minutes
Step 1: Start by creating a new document, 500 by 500 pixels here. Take the paint
and fill the black background. Then create a new layer and take the gradient tool and the tool bar above, and isolate diamond and take as a first color "white" then take as white fades to transparency in the bar above (left of the diamond ). And by holding down the Shift key made of stars everywhere on your image.
Step 2: Now go to the menu Filter> Distort> Polar Coordinates and select Rectangular Polar.
Step 3: Now duplicate your layer and each time you duplicate, make a 90 degree rotation by going to the menu: Edit> Transform> Rotate 90 degrees clockwise , make it 4 times.
Step 4: Create a new layer and fill it with blue color code is # 0673F9 and move this layer to color mode. Now images of 2 layers, apply a bevel effect stamped with the default options and outer glow and set the parameters as below (white color).
Step 5: Now on the other 3 layers, apply a whirl effect for that go to the menu: Filter> Distort> Tourbillon , take value as 316 degrees.
Step 6: Now duplicate layers containing ALL the stars and apply them a gaussian blur of 10 this go to the menu: Filter> Blur> Gaussian Blur , Hint: Duplicate the first layer and then the Gaussian Blur effect then duplicate the second and press Ctrl + F to produce the effect you will go much faster.
Step 7: Now create a new layer and Take the line and set the tool as below:
Step 8: Now draw lines 5 and apply a Gaussian Blur of 6.5 pixels. You must get this:
Step 9: Now go to the menu: Filter> Distort> Contraction , and apply a value of 100%. Then go to the menu: Filter> Blur> Radial Blur , rotation settings: Normal / size: 21.
Step 10: Now go back on the layer with the black background and go to the menu: Filter> Render> Halo (50 -300 mm Height: 100 in the center of the layer).
Stay on this layer and go to the menu: Filter> Aesthetics> Find Edges , and then press Ctrl + I on your keyboard to invert the colors. And still on this layer go to the menu Filter> Artistic> Plastic Wrap : Intensity 5 / Detail: 7 / smoothing: 12.
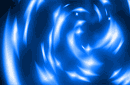
This photoshop tutorial is over. I hope it will help you advance ... and here is the result below.
 WIRO SABLENG