Thursday, June 4, 2015

Tutorial Photoshop Make a Glowing Text

Tutorial Photoshop Make a Glowing Text - Step 1 First download this file to install the font: http://www.dafont.com/tr2n.font . and install the font
Open a new image in Photoshop, take as 500px size 215 and fill the background it black.
You can also retrieve the image that I used to start above.


Step 2 Take the text tool with Tron font you just installed, set first color as a blue sky (here: # 00f6ff).
Type the text with a size of 85 pt.

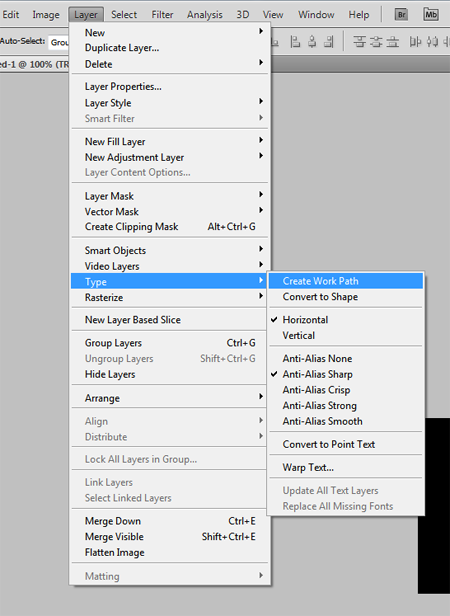
Step 3 Then go to the menu: Layer> Type> Create Work Path


Step 4
Create a new layer and hide the previous (click on the icon with the Ã… "it), take the brush tool and the blue color (here: # 00f6ff). Take the default brush with a size of 4 pt.

Now go to the Paths tab of the Layers window, right-click Work Path and click Stroke Path.


Check that it is the brush tool is selected and click OK.


Step 5 Return to the Layer tab, double-click the layer that you create will appear mergers options and click the Outer Glow option and set it as below:

Step 6 Click on Inner Glow this time and set it as below. (Attention: the color is not white but beige)


Step 7 Duplicate this layer Layer> Duplicate or Layer> Duplicate


Step 8 Now we will remove the style applied to the layer that lies underneath (normally the first set), for it right click it and select the style clear option. Then return to the Path tab of the Layers palette and remove the path this time. Return to the layer tab and then press Ctrl + T. slightly closer now both sides toward the center, like this:


Step 9 Now Decrease the opactité of this layer to 80%, then choose Create a new text as Centry Gothic font and set text as below:


Step 10 Type the text you want, double-click the layer to go to the blending options then click Gradient Overlay and set the gradient like this:

And here's the final result:


Wednesday, June 3, 2015

Photoshop Tutorial: Make a Blue Star Effect

Photoshop Tutorial:  Make a Blue Star Effect - This photoshop tutorial is not so hard to achieve but rather long + or - 14 minutes


 Step 1: Start by creating a new document, 500 by 500 pixels here. Take the paint

and fill the black background. Then create a new layer and take the gradient tool and the tool bar above, and isolate diamond and take as a first color "white" then take as white fades to transparency in the bar above (left of the diamond ). And by holding down the Shift key made ​​of stars everywhere on your image.


Step 2: Now go to the menu Filter> Distort> Polar Coordinates and select Rectangular Polar.
Step 3: Now duplicate your layer and each time you duplicate, make a 90 degree rotation by going to the menu: Edit> Transform> Rotate 90 degrees clockwise , make it 4 times.

Step 4: Create a new layer and fill it with blue color code is # 0673F9 and move this layer to color mode. Now images of 2 layers, apply a bevel effect stamped with the default options and outer glow and set the parameters as below (white color).


Step 5: Now on the other 3 layers, apply a whirl effect for that go to the menu: Filter> Distort> Tourbillon , take value as 316 degrees.

Step 6: Now duplicate layers containing ALL the stars and apply them a gaussian blur of 10 this go to the menu: Filter> Blur> Gaussian Blur , Hint: Duplicate the first layer and then the Gaussian Blur effect then duplicate the second and press Ctrl + F to produce the effect you will go much faster.
Step 7: Now create a new layer and Take the line and set the tool as below:


Step 8: Now draw lines 5 and apply a Gaussian Blur of 6.5 pixels. You must get this:


Step 9: Now go to the menu: Filter> Distort> Contraction , and apply a value of 100%. Then go to the menu: Filter> Blur> Radial Blur , rotation settings: Normal / size: 21.


Step 10: Now go back on the layer with the black background and go to the menu: Filter> Render> Halo (50 -300 mm Height: 100 in the center of the layer).
Stay on this layer and go to the menu: Filter> Aesthetics> Find Edges , and then press Ctrl + I on your keyboard to invert the colors. And still on this layer go to the menu Filter> Artistic> Plastic Wrap : Intensity 5 / Detail: 7 / smoothing: 12.

This photoshop tutorial is over. I hope it will help you advance ... and here is the result below.